How to Use Frames in Canva (Step by Step Tutorial)
Canva is a popular graphic design tool offering various elements, photos, and videos to create your own stunning designs for your marketing efforts. It is available for free or with a paid subscription, and either way, it offers users plenty of options. Many customizable templates are available in the free version of Canva that you can add to any type of content. This means you can create unique designs quickly and easily.
Canva Frames
Canva frames can be a great way to add color, effects, and flexibility to designs. The frames are helpful when you want to design mockups, create photo effects, or add fun shapes and styles to your designs. This tutorial will show several ways to use these frames with photos and videos.
Canva offers a variety of frames that you can add photos to create a professional-looking layout. The frames have the cloud and hill image in Canva’s layout grids, indicating that they are ready to add photos.
There are three main ways to add an image or photo to a Canva design: dropping it in, using a grid where the picture fills the space, or using one of the many photo frames, which you’ll learn about here.
How do you use frames in Canva?
First, on the homepage, you can select a blank template that includes the preset dimensions for whatever type of marketing material you want to create.
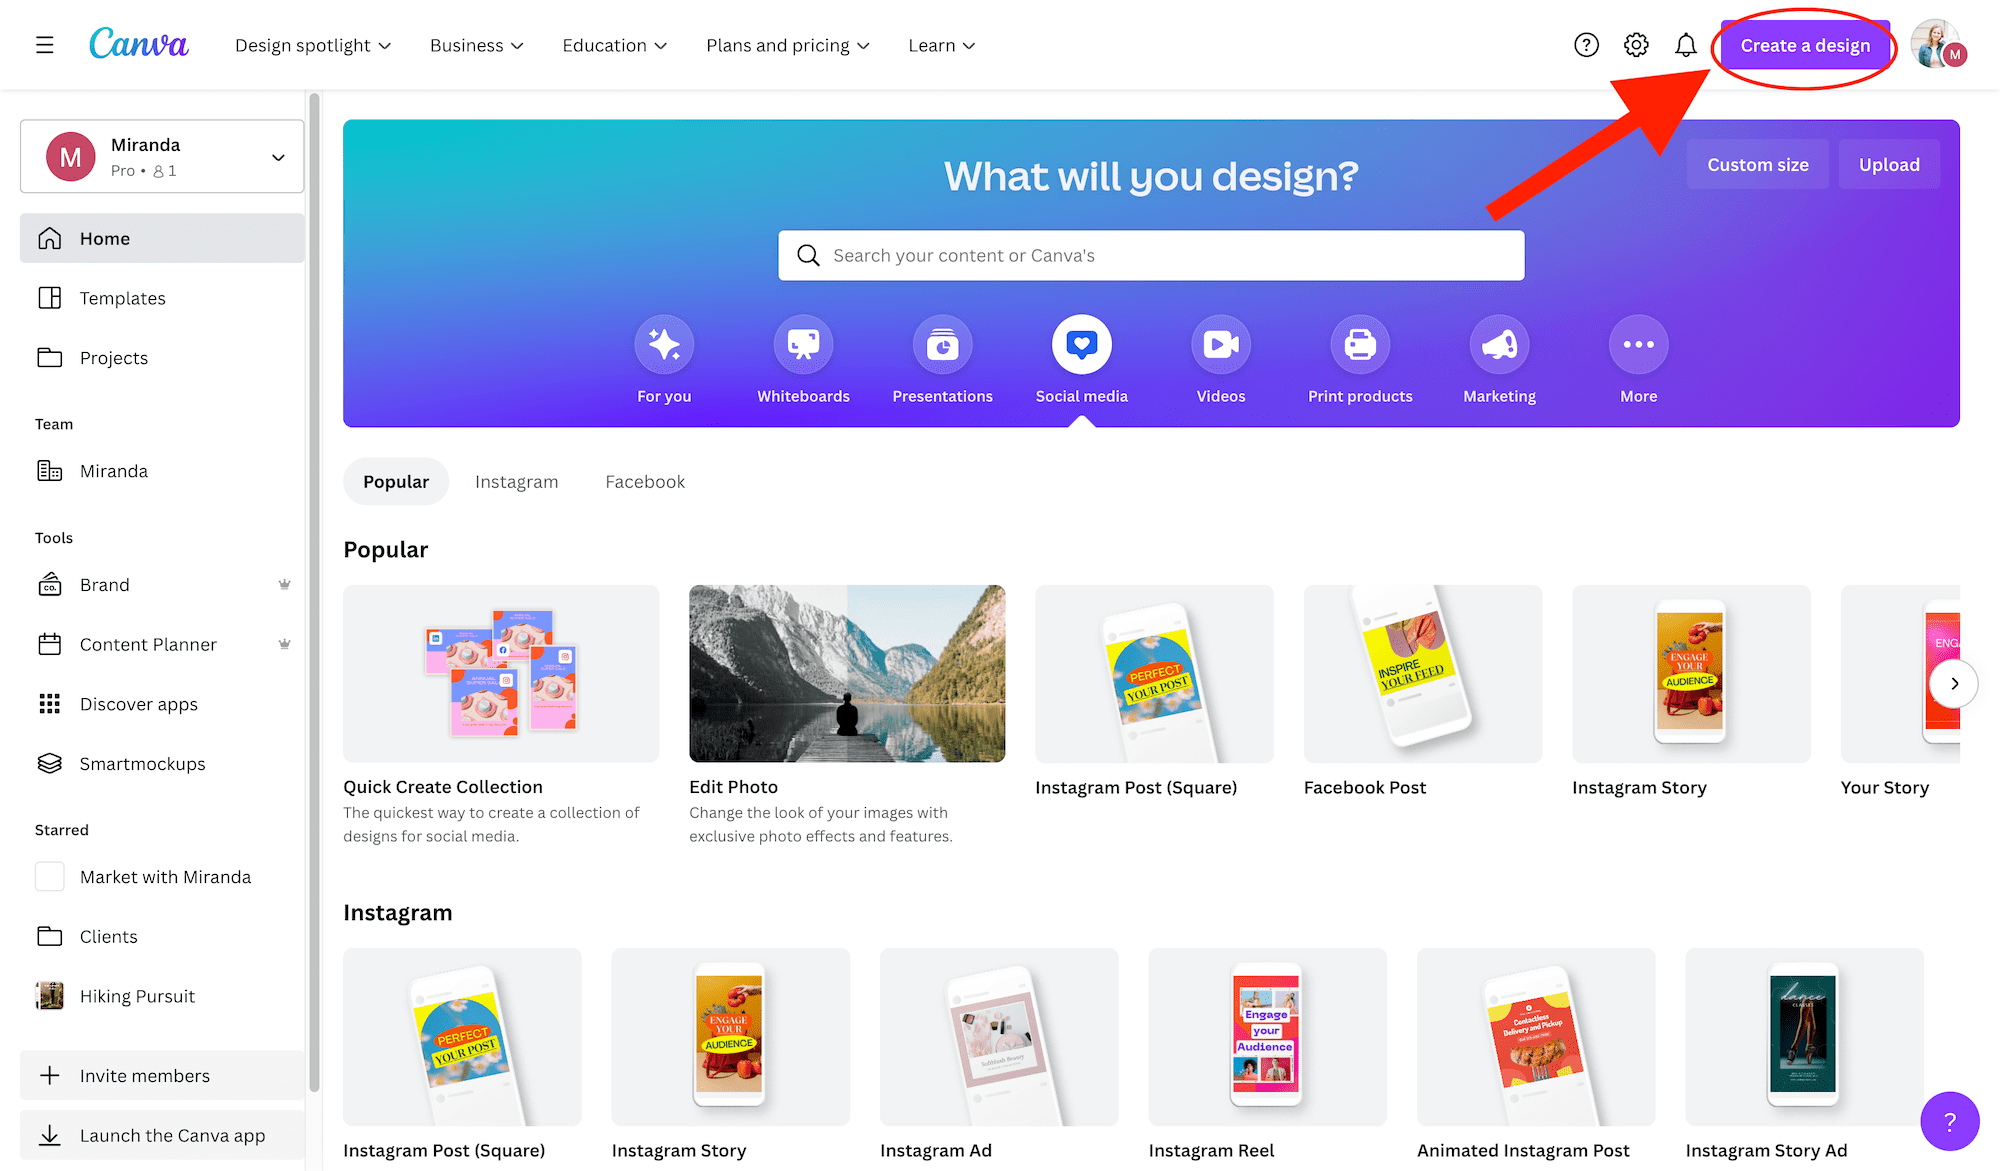
Or you can plug in your own custom dimensions and start with a blank canvas. To do that, you will click the Create a design button in the top right-hand corner of the screen.

How do you add frames in Canva?
To add one of the Canva frames to your design, head to the “Elements” tab on the left-hand side and scroll down until you find the “Frames” section. Tap on the frame you wish to use, and then drag the image or video you want to use into it.
Pick the one you want to use. Click on it, and then it will appear in your design.
Canva is constantly adding new frames to this category. You should save the ones you use the most to a favorites folder so you can easily find them for future use.

How do you move a picture into a frame in Canva?
You can either select stock photos to use inside the Canva library or upload your own photos.
To choose which photos you want to place in the frames, simply click on them while they are inside the frame. Once you have selected your photos, you can adjust their size by double-clicking on them and dragging them.
Can you resize the Canva frames?
You can resize a frame to make it larger or smaller, depending on what you want to do.
If you want to make the frame larger, just click and drag the bottom border of the frame up. If you want to make it smaller, just click and drag the top border of the frame down.

To make a graphic larger or smaller, use one of the white dots in the corners. Click on it and drag it into one of the corners.
To move the photo within the frame, double click its thumbnail. The editing panel will appear.
There is an image of a person in a frame. You can see the outline of the frame behind the image so you can get it just right.

Popular Frames to Use in Canva
After you go to the Frames section, you can use the search bar to find specific kinds of frames.
Simple shapes are perfect for a business card, email signature, or newsletter design. I typically use the circle, square, or rectangular frame for a portrait image.

You can also use these computer mockups.
There are also some unique shapes you can use for more creative designs. Search for polaroid frames, letter frames, or number frames.
Bottom Line
You can create a beautiful, professional-looking Canva design with these simple steps.
Canva frames are a fun way of cropping images and videos into whatever shape you can think of. By following the basic steps of adding photos and videos into the frames, you can create stunning social media posts using Canva.
Need more help? Check out these Canva tutorials and resources: