How to Create Google Web Stories

Google Web Stories are one of the top marketing trends happening in 2022. They are a great way to repurpose your blog posts into easy-to-consume content for your readers. Plus you might see massive increases in your organic website traffic. Learn more about how to create Google Web Stories here!
Do you remember when Instagram introduced the short stories concept after Snapchat? How well do social media users respond to it?
Now we have TikTok, Facebook Stories, Instagram Stories, Instagram Reels, and even… Fleets? (Those were short-lived).
The short story concept is all the rage these days!
Because of that, Google has launched its own version of the popular story format: Web Stories. This new feature allows website owners to take full advantage of storytelling aided with visual content.
This guide will cover everything about Google Web Stories and how to use the WordPress Web Story plugin to create visual stories that promote your brand.
What Are Google Web Stories?
Stories have caught Silicon Valley’s attention since Snapchat’s arrival, and it’s really increased in popularity since the arrival of TikTok. The users on these social media apps love capturing different moments on camera and sharing them with the world. The same is the case for Instagram and Facebook.
However, Google Web Stories are a bit different than the rest. Google Web Stories are full-screen, tappable web pages powered by Accelerated Mobile Pages (AMP). It means you can’t make web stories without the AMP framework.
In simple words, each story is a unique web page on your WordPress blog consisting of images, text, animation, and other visual effects.
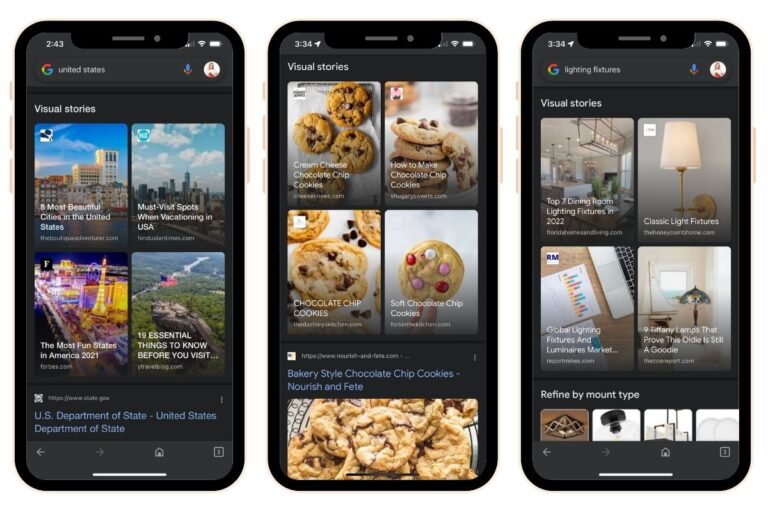
Stories have their own carousel section in Google Discover (this is a separate smartphone app from Chrome, Safari or Firefox). More on that below!
Benefits of Publishing Google Web Stories
Let’s go over some of the benefits of publishing Stories as a way to engage your readers with pictures and videos as well as boosting your organic web traffic.
Your Web Stories are Directly Featured on Google Discover
If you aren’t familiar with Google Discover, this was a new feature that launched in 2018. It’s a smartphone app that you can download and use on various mobile devices.
Google shared that the app has at least 800 million users every month (source). That number has probably increased since 2018, although I haven’t located an up-to-date stat yet.
Using AMP, the stories created are directly placed in the Stories carousel section on the Discover app. These Google web stories are readily available for millions of global users on the web.
This eliminates the application-based restrictions done by other social media platforms like Facebook, Instagram, and Snapchat.
You Own the Content
Google Web Stories were created with mobile functionality in mind. Marketers and website owners can directly create and publish these web stories to their WordPress websites without external applications.
Unlike the content you publish on social media, your Google Web Stories become a part of the open web. Plus the stories are published on your own website with their own custom URLs attributed to your domain name.
This gives you the freedom to publish how you want to without platform restrictions.
Repurpose Your Best Performing Blog Posts
With Google Web Stories, you can breathe new life into your top ranking posts that show up in search engine results.
Create Stories around your blog posts that receive the highest amount of web traffic. If you have a blog post that’s already ranking in one of the top 3 spots on Google, then Google thinks that you’re an expert on a particular topic.
So if you recreate that blog post into a Web Story, there is a very good chance that Google will display your story in the Discover app.
Enhance Your Website SEO
When you follow the best practices for publishing Google stories, you can definitely improve your website’s SEO.
If you follow Google’s guidelines, can create stellar content that highly engages people.
Web Stories are Easy to Create
With the Web Stories plugin, Google Web Stories aren’t hard to create at all. Each web story gives users consistent user interface controls or buttons through which they can share content. Moreover, content creators or marketers can only add up to thirty words that should be meaningful and related to their content.
This makes these web stories highly tappable and sharable. Plus, the technical side of creating the web story is pretty simple for users to easily navigate and create intriguing stories.
You Can Make Money from these Web Stories
Google Web Stories are the latest advancement in reaching out to your readers and visitors. With the full-screen immersive ads and affiliate links, you can generate additional revenue.
This isn’t only helpful for publishers like you but also for advertisers. Google Web Stories give advertisers a new way to reach their audience through modern and exciting storytelling methods and convert them into paying customers!
Note: Ads provided by AdThrive or MediaVine are limited right now. Right now, these stories will not generate the same amount of income as your blog posts.
Fun Way for Your Readers to Engage with Your Content
The visual narratives and small screen experiences keep the users engaged without losing interest. When you connect with your audience in a fun way and entertain them with exceptional content, you will be able to increase your sales!
How to Create Google Web Stories
Since we are talking about Google Web Stories for WordPress, you can create visual stories within your own WordPress dashboard. It’s free and easy to publish!
First, you need to download and install the official web stories WordPress plugin. This plugin was developed by Google so I think it will provide the best results. Once it’s installed, you will see a Stories button on the lefthand menu in the WordPress dashboard.
Quick SEO Overview
- Create a custom title for your web story (don’t duplicate the blog post title that you’re promoting)
- Upload a Publisher logo, preferably 96 x 96 pixels and avoid text logos; it will display in the top left corner over the cover photo
- Make sure your cover photo is 828 x 1792 pixels and do not put text on your cover photo; this is the image that users will see in the Discover carousel so make sure it’s eye-catching!
- Keep your templates simple when you’re first getting started. There is no need to add all sorts of transitions and distractions. Prioritize the user experience and loading times first.
- Google recommends a minimum of 10 slides. I’ve seen some stories perform well with less than 10 though.
Read the Best Practices Provided by Google
If you prefer to watch a video tutorial, you can learn how to create Google Web Stories in the video below:
Now if you would like to read a step-by-step process, let’s go over how to create your first web story!
Create a StorY Template
The first thing you want to do is create a template because this will save you so much time and make it easy to duplicate and publish new stories.

To create your first story, navigate to Stories and then to Add New. Over there, you will find a black editor with a white canvas. The editor’s interface is relatively simple with easy functions.
Here’s what you need to know:
- You have all the functions you require on the left panel in your stories, like media elements and layouts.
- The middle portion contains the white canvas where you will be dragging your elements and editing them.
- On the right sidebar, you have all your customization options for all the elements you add to your canvas, along with the document’s settings, before publishing them.
In this editor, you can also upload personal media files. Plus, you can access a vast library of free videos, images, and GIFs that come with the plugin. You can also take advantage of the pre-made layouts offered to you if you don’t want to make a custom story.

Add Your Background
Click on the white canvas and then navigate to the right sidebar to change the background color of the canvas.

If you want to fill the background of the canvas with a picture, you can upload it from your device or choose one from the plugin’s picture library.
However, you can perform both of these functions using the left sidebar. You also have the option of filling the entire canvas with an image by clicking the “Fill” option.
Add in Some Text
On the top left corner, you have the option to add text in the form of the ‘T’ symbol. You can select a preset style and font. Once you click on this symbol, a text box will appear on the background of your canvas.
If you aren’t creative enough and want to use pre-existing preset styles, you can find them here too. Adjust your text by dragging the text box from the corners to make the text bigger or smaller.
If you want to change the color, font, positioning, opacity, and animation of the text box, simply select the text and change it from the right sidebar.
Put in Some Shapes and Layouts
You can also add shapes and layouts to enhance the look of your template. This makes your web stories even more engaging and interesting.
In addition, the plugin also has a library of shapes and animated layouts that can come in handy if you don’t want to edit a web story from scratch. Keep in mind that these shapes are also customizable.
Add Multiple Pages to the Web Story
When it becomes easier for you to set your hands on the editor’s elements and interface, you can start creating Google Web Stories of multiple pages.
You can locate this checklist at the top right sidebar. Moreover, right below the canvas, you are offered a few options to delete or duplicate the page you are currently working on.
You can also perform these redo, undo actions, and play the story on a new page.
It’s recommended that you have 10-20 slides on your stories.
Publish the Google Web Story
When you’re done with editing and designing your web story, click on the Document option present on the right sidebar to ensure that you have filled the recommended setting before you publish your web story.

Moreover, you can schedule the publication date for the story if you don’t want to publish it right away.
Then, upload the cover image and logo, write the story description, put the story slide on automatic or manual, and type the duration you want to keep between slides and publish your story.
What to Do After You Hit Publish
There are a few important steps you need to take immediately after you hit publish. While there is a preview mode in the Stories plugin, it’s best to check the performance of your Stories on mobile devices.
First thing: Verify that your story is AMP qualified with this URL inspection tool. I find that this is never an issue as long as I follow the guidelines provided in the plugin, and I’m avoiding large video files for now.
Send a link to your Story to one of your mobile devices (I save the links on my Notes app on my iPhone). Then I open the link on my iPhone to double check that all of the slides are loading quickly, that all the text is legible, and that any links are easy to click on.
If you can check each story on multiple devices, do that. The layouts will look different on an iPad vs a smartphone, for example.
Hire Me
I hope you found this guide helpful and that you’re able to make stories for your own brand. There are a great way to boost organic traffic to your blog and grow your business!
If you’d like to hire me to create your stories for you, then check out my Web Story creation services here.