How to Use Google Search Console: Mastering the Basics

Google Search Console is a powerful tool that helps you optimize your website’s performance on Google Search.
Using this free service, you can gain valuable insights into how your site is performing, which keywords are driving traffic, and what you can do to improve your search rankings.
Implementing Google Search Console is necessary for anyone serious about boosting their website’s visibility in search results.
To get started with Google Search Console, you’ll need to verify your site ownership and explore the available features within the dashboard.
As you become familiar with the various reports and tools, you’ll uncover actionable information that can help you optimize your site for SEO.
Key Takeaways
- Gain insights on website performance using Google Search Console
- Improve search rankings by leveraging the provided data and recommendations
- Apply the information to enhance SEO and user experience on your site

Setting Up Google Search Console
Verification Methods
To use Google Search Console, you first need to verify your website. There are several verification methods to choose from:
- HTML file upload: Upload a specific file provided by Google to your website’s root directory.
- HTML tag: Add a unique meta tag to the
<head>section of your website’s homepage. - Domain name provider: Verify your domain by creating a DNS TXT record or CNAME record.
- Google Analytics: Use your existing Google Analytics tracking code as a verification method.
- Google Tag Manager: Verify your site through an existing Google Tag Manager container.
Choose the best method for you and follow the instructions in the Search Console.
Adding a Property
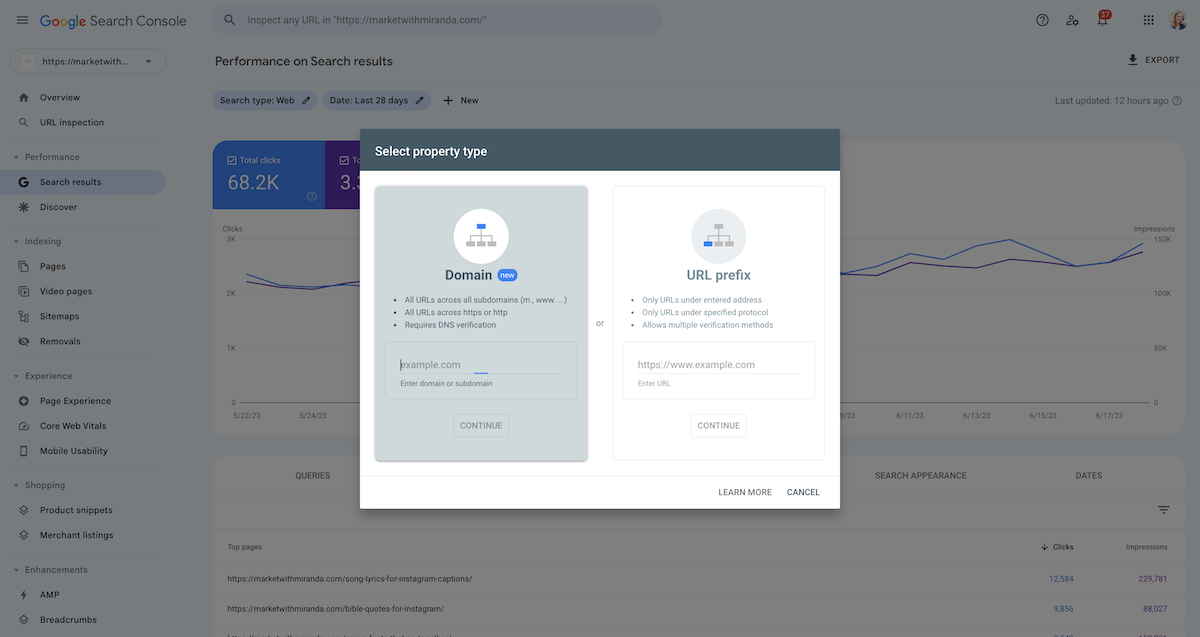
Once you’ve verified your website, it’s time to add a property in Google Search Console. Properties can be your website’s domain or URL-prefix:
- Domain: This includes all subdomains and URLs within your domain (e.g., example.com, blog.example.com, and shop.example.com). To add a domain property, you’ll need to verify your domain through your domain name provider.
- URL-prefix: This includes a specific part of your website (e.g., only example.com). To add a URL-prefix property, you can use any of the available verification methods.
To add a property:
- Sign in to your Google Search Console account.
- Click the “Add property” button.
- Choose between “Domain” and “URL-prefix” properties.
- Enter your website’s domain or URL-prefix.
- Follow the verification steps for the chosen property type.
After you’ve added and verified your property, you can start using Google Search Console features to analyze your website’s performance, fix issues, and optimize your content.
Understanding the Dashboard
Overview
The Google Search Console dashboard is your central hub for monitoring and improving your website’s performance on Google Search.
When you open Search Console, the dashboard will display an overview of your website’s performance, including the total number of clicks and impressions.
You’ll also see important issues and recommendations tailored to your site.
Performance
One of the key components of the dashboard is the Performance report. This offers valuable insights into how users are finding your website in Google Search and allows you to track user behavior over time. Key metrics in this report include:
- Total clicks: The number of times users clicked on your website in search results.
- Total impressions: The number of times your website appeared in search results.
- Average click-through rate (CTR): The percentage of impressions that resulted in a click.
- Average position: Your website’s average ranking position in search results.
By understanding these metrics, you can identify areas of your website that may need improvement and optimize your content to drive more relevant traffic.
URL Inspection
Another useful tool within the dashboard is the URL Inspection feature. This tool helps you identify how Google crawls, indexes, and serves specific pages on your website. With this information, you can:
- Check the current index status of a URL.
- Discover any indexing issues and uncover potential solutions.
- View the last crawl date and the HTML content retrieved during the crawl.
- Analyze structured data, AMP (Accelerated Mobile Pages), and mobile usability for the URL.
By utilizing the URL Inspection tool, you can address any issues that may be impacting your website’s visibility on Google Search and ensure your pages are properly indexed.
Optimizing for SEO
With Google Search Console, you can optimize your website’s performance in search engine results. In this section, we’ll cover two key features that can help improve your SEO: Index Coverage and Sitemaps.
Index Coverage
The Index Coverage report in Google Search Console helps you understand how your site is indexed by Google and resolve issues that may prevent Google from crawling and indexing your pages. Here’s how to monitor your site’s indexing status:
- Sign in to your Google Search Console account.
- Select your website property from the dropdown menu.
- In the left-hand navigation pane, click on “Index” and then “Coverage.”
You’ll see a summary of your site’s indexing status, including errors, warnings, valid pages, and excluded pages.
By addressing errors and warnings, you can ensure that your site’s important pages are indexed by Google, which can improve your visibility in search results.
Some common index issues include server errors, redirect errors, and blocked resources. To fix these issues, follow Google’s recommendations in the Details tab for each error or warning.
Sitemaps
A sitemap is a file that lists all the web pages accessible to search engines on your site. Submitting a sitemap to Google Search Console can help Google discover and index your site’s pages more efficiently.
To submit a sitemap, follow these steps:
- Create a sitemap for your website. Many content management systems like WordPress have built-in sitemap generators, or you can use one of many online sitemap tools.
- Upload the sitemap file (usually named
sitemap.xml) to the root directory of your site. - Go to your Google Search Console account and select your website property.
- In the left-hand navigation pane, click on “Sitemaps.”
- In the “Add a new sitemap” section, enter the URL of your sitemap file (e.g.
https://example.com/sitemap.xml) and click “Submit.”
Once submitted, Google will process your sitemap and start crawling your site’s pages. Monitor the “Sitemaps” section to see if there are any issues with your submitted sitemap or if you need to make updates.
By staying informed about your site’s index coverage and regularly submitting sitemaps, you can optimize your website for SEO and improve its performance in Google search results.
Enhancing User Experience
Core Web Vitals
To improve the user experience on your website, it’s essential to pay attention to the Core Web Vitals. These are a set of performance metrics that measure how users perceive the experience of interacting with your web page. They include:
- Largest Contentful Paint (LCP): measures loading performance. Aim for an LCP of 2.5 seconds or less.
- First Input Delay (FID): measures interactivity. Aim for an FID of 100 milliseconds or less.
- Cumulative Layout Shift (CLS): measures visual stability. Aim for a CLS score of 0.1 or less.
You can use the Google Search Console to monitor these metrics and identify any issues that need to be addressed.
Mobile Usability
Another crucial aspect of user experience is mobile usability. Since more and more users access the web from their mobile devices, it’s important to ensure your website is mobile-friendly. In the Google Search Console, you can find reports that describe your users’ experience on mobile devices. Use these insights to:
- Identify and fix mobile usability issues: Check for issues such as small font sizes, viewport not set, and content not sized to viewport. Addressing these issues will improve the user experience on your site.
- Improve site navigation: Ensure navigation and menus are easy to use and accessible on mobile devices. This helps users find the information they need without frustration.
- Optimize images and loading times: Compress images and use lazy-loading techniques to improve page loading performance on mobile devices. This will enhance the overall user experience.
Remember, focusing on Core Web Vitals and Mobile Usability will significantly improve your website’s user experience. Regularly monitor and address these areas using the Google Search Console, and your users will thank you for it!

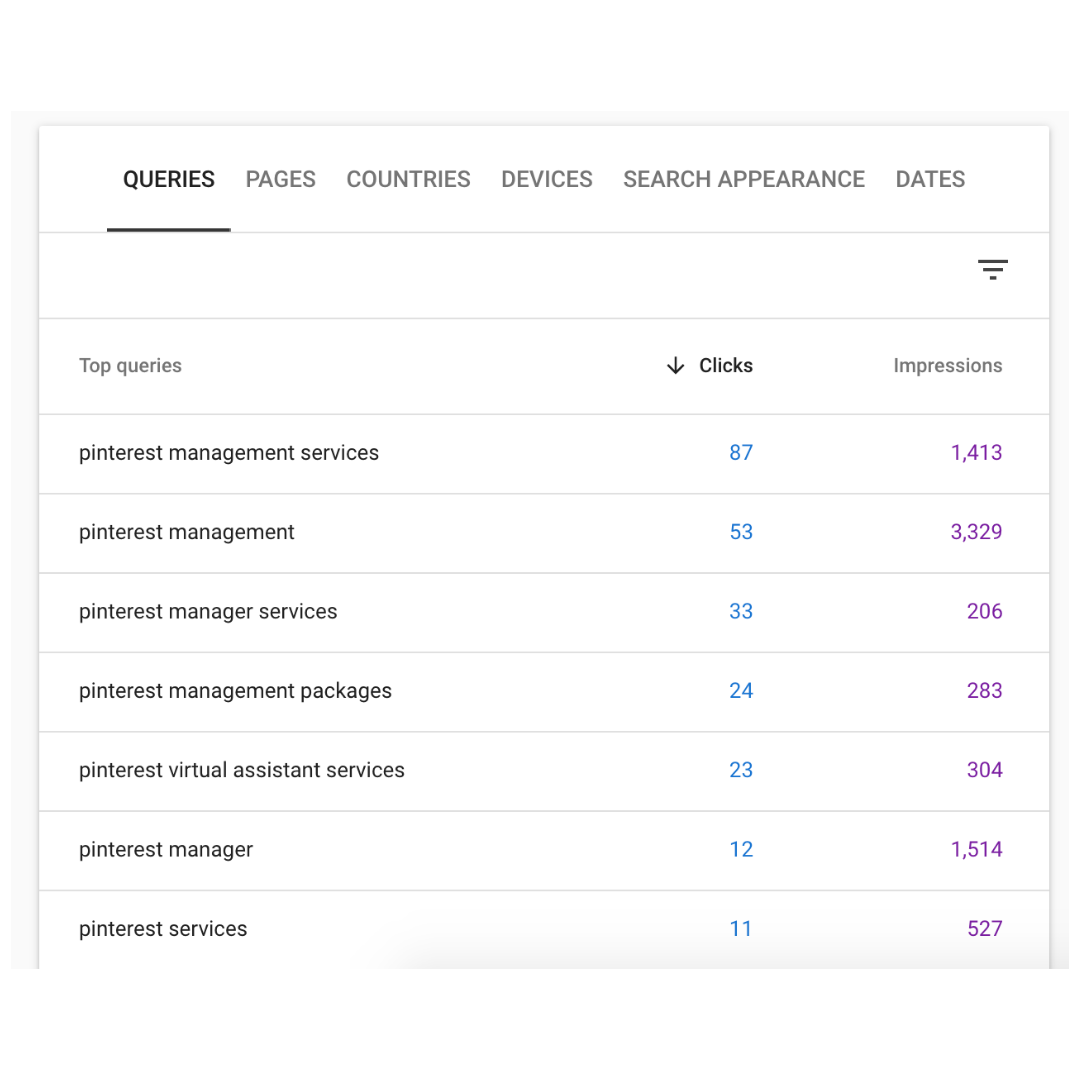
On the left-hand side, select Performance. This graph shows you what search queries Google is pulling from your website.

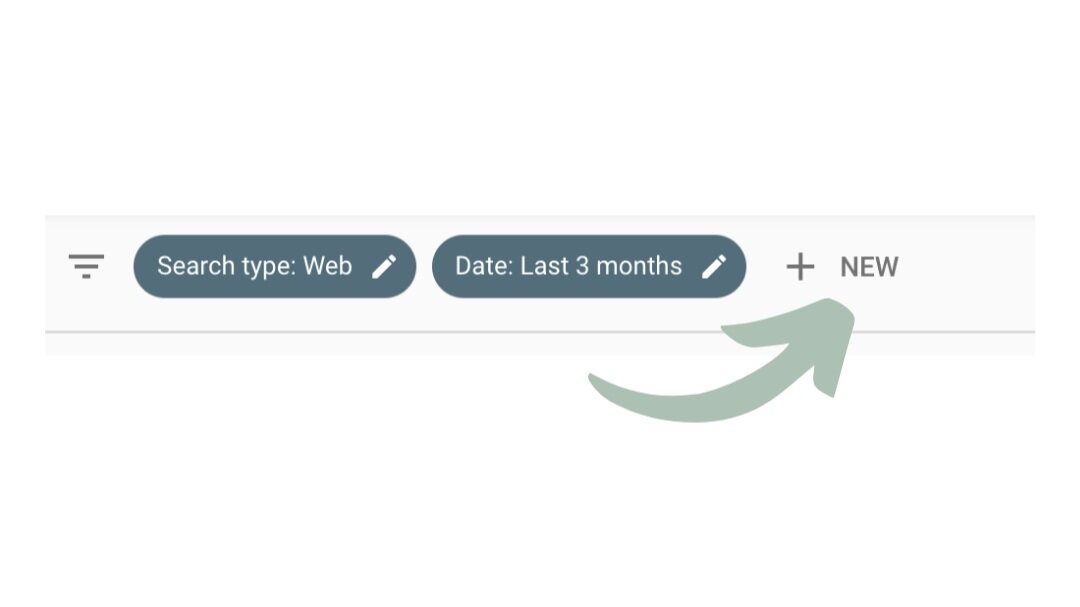
On the next screen, these options can be seen near the top. Click the plus button (+) next to NEW.
Select Query and then type in the keyword. In my account, I typed in “Pinterest”.

“Average Position” refers to my website’s location in the Google search results for the keyword “Pinterest”.
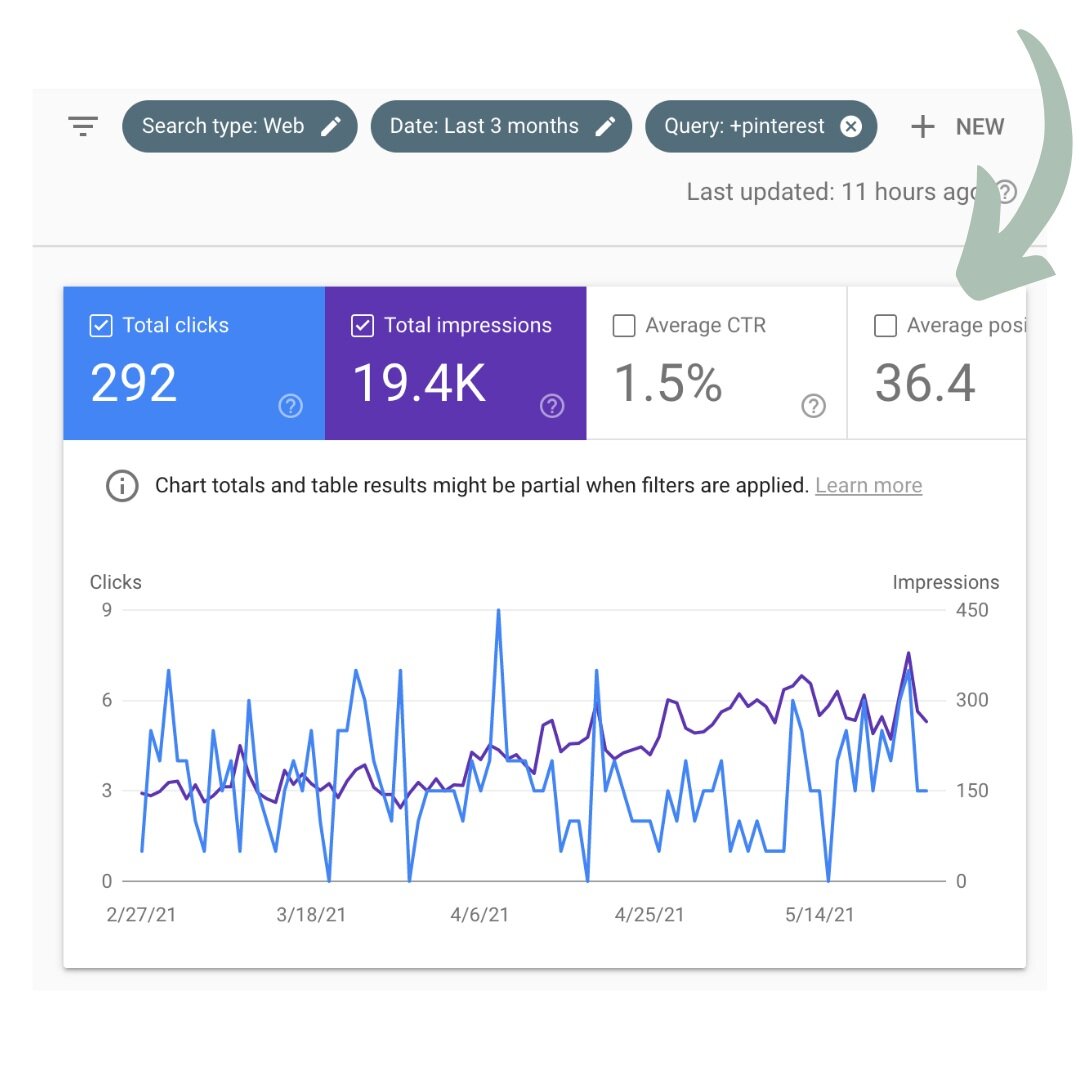
Typically, Google shows 10 URLs on the first page (depending on the keyword), so my website is anywhere on page 3 to page 5 when users search for “Pinterest”.
Below the chart, I can see additional keywords related to “Pinterest” that my website ranks for. With this information, I can better understand how Google is reading my website, and I can plan my content marketing accordingly!