How to Write a Blog Post on WordPress: A Quick Guide
Creating a blog post on WordPress can seem daunting at first, but with a little guidance, you’ll find it’s easier than you think.
In this step-by-step guide, we’ll walk you through the process of writing and publishing a blog post on WordPress, ensuring you have all the necessary tools and knowledge to share your thoughts and ideas with the world.
Throughout this guide, we’ll touch on best practices for editing and formatting your post, as well as tips for making your content more SEO-friendly, to improve your chances of reaching a larger audience.
Step 1: Choose Your Niche
Identifying Your Niche
Choosing your blog niche is essential before you start creating a blog post on WordPress. A blog niche is a specific, narrow topic or subject area focused on your content.
To identify your niche, consider your passions, interests, and expertise. Ask yourself:
- What topics do you enjoy discussing or researching?
- Are there subjects where you possess unique knowledge or experience?
Selecting a niche that you’re passionate about will give you a deeper understanding, allowing you to create high-quality content that engages your audience.
Defining Your Audience
Once you’ve identified your niche, defining your target audience is essential. To do this, consider the following questions:
- Who will be interested in reading your content?
- What demographics or groups do they fall into (age, gender, location, etc.)?
- What specific problems or questions do they have?
Having a clear understanding of your audience will help tailor your content to their needs and preferences.
Remember to keep your niche focused, as a very narrow niche, like “Marvel Avengers iPhone Cases,” probably isn’t work well in the long run.
By carefully choosing your niche and defining your audience, you’ll be better equipped to create a successful blog on WordPress. Stay tuned for more steps to help you create engaging, high-quality blog posts.
Step 2: Do Keyword Research

RankIQ
Before you start writing your blog post, finding the right keywords to target is crucial. One effective tool for this purpose is RankIQ.
To begin, create an account and log in to the platform.
Once you’ve logged in, follow these steps:
- Enter your main topic or focus keyword in the search bar, and RankIQ will present you with relevant suggestions.
- Browse through the lists of long-tail keywords and related phrases, taking note of the ones that best match your content.
- Pay attention to the keyword difficulty, search volume, and competition columns, aiming for low competition and high search volume keywords.
By targeting the right keywords, you’ll ensure that your content is found by the right audience and ranks higher in search results.
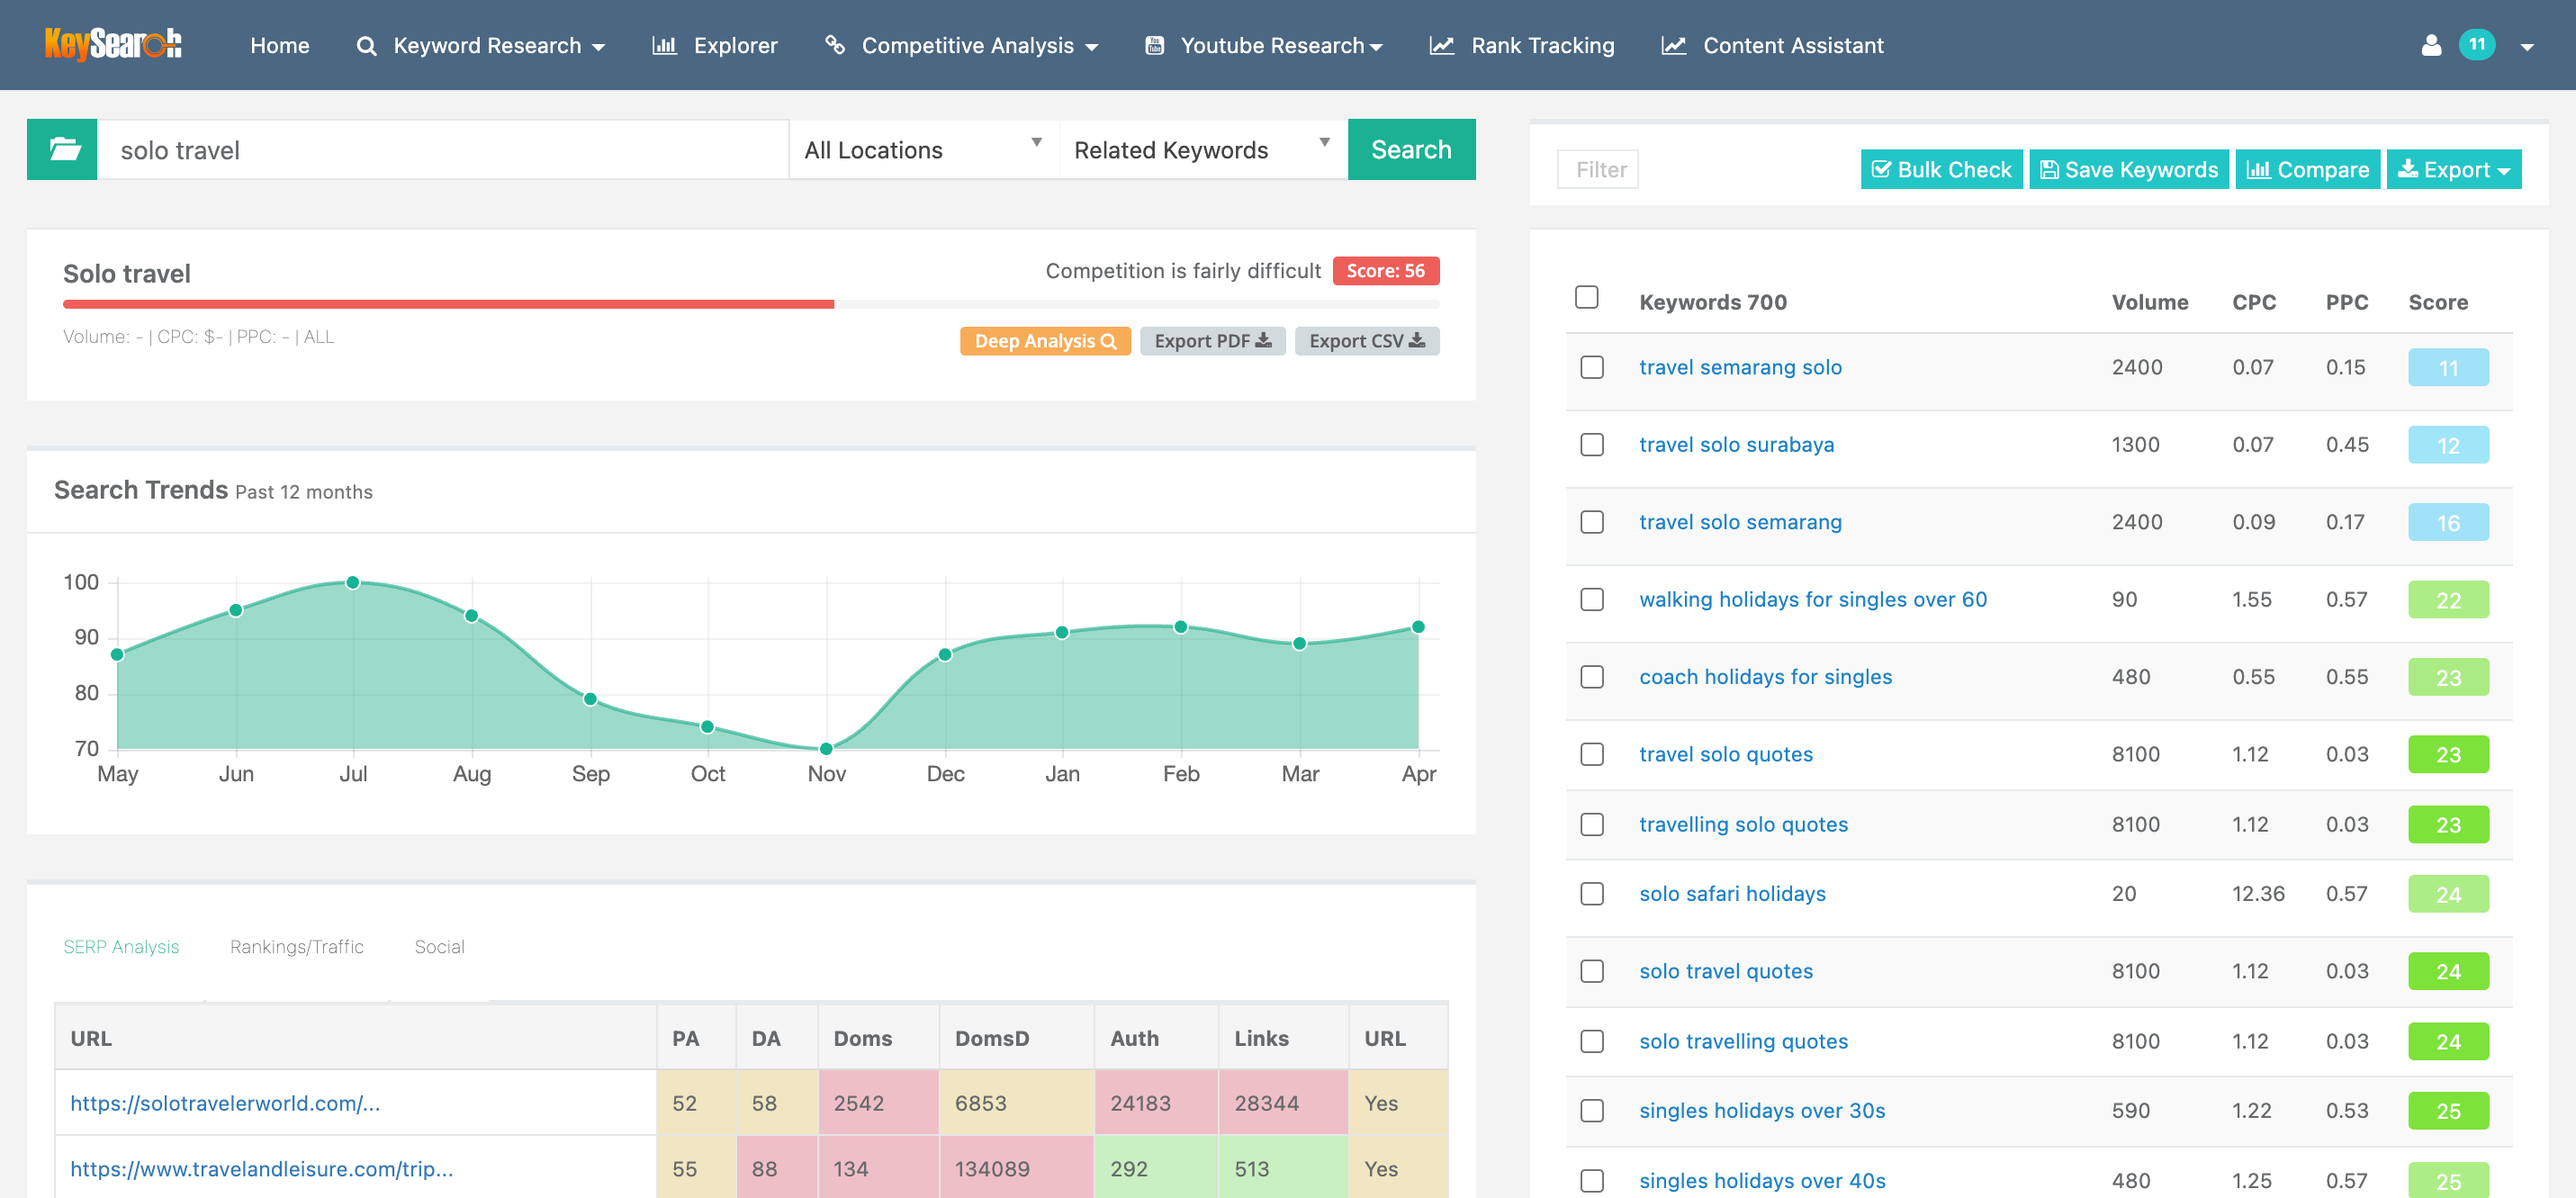
KeySearch
Another useful tool for keyword research is KeySearch. Just like with RankIQ, start by creating an account and logging in. With KeySearch, follow these steps to find the best keywords:
- Enter your main topic or focus keyword in the search bar and click the “Search” button.
- You’ll see a list of keyword suggestions, alongside search volume, competition, and other metrics.
- Filter the results (e.g., low competition, high search volume) to find the most relevant and achievable keywords based on your content.
KeySearch offers features such as keyword rank tracking, backlink analysis, and content assistant, which can further enhance your WordPress blog post’s performance.
Using tools like RankIQ and KeySearch, you can effectively conduct keyword research for your WordPress blog post, giving it a solid foundation for attracting organic traffic and ranking higher in search results.
Remember to balance your keyword choices between relevance and competition, ensuring that your content has the best chance of success.
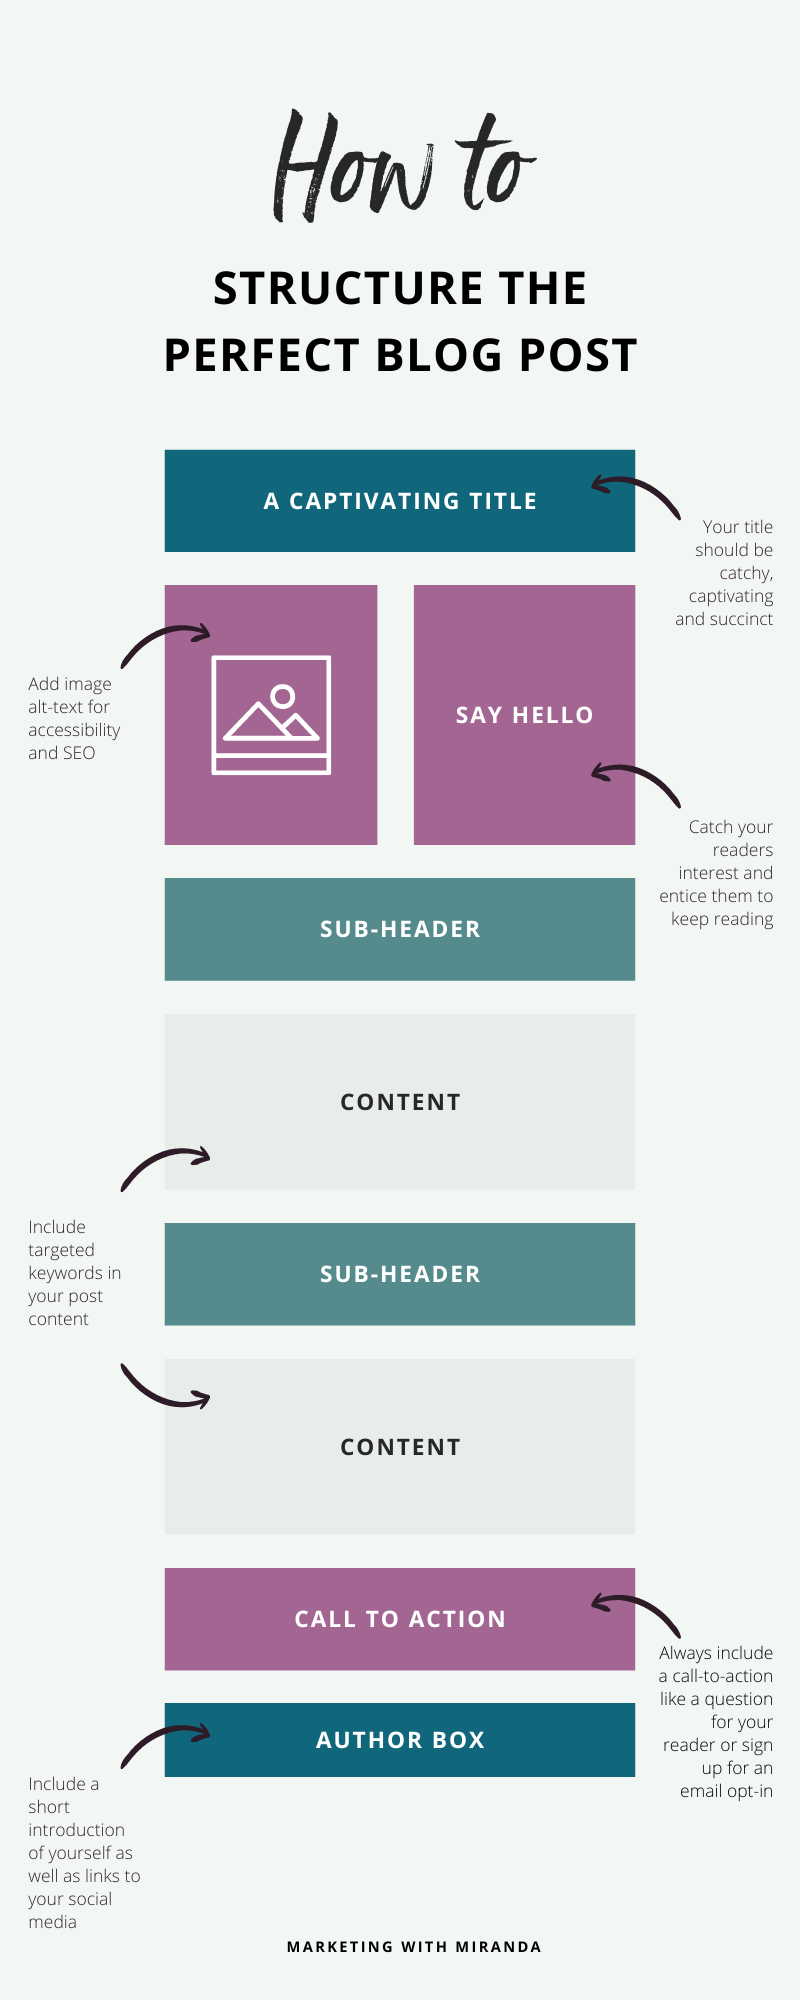
Step 3: Create High-Quality Content
Create an Outline
Before diving into writing, create an outline to organize your ideas and ensure a logical flow of information. Start with your main topics and break them down into subpoints. This will act as a roadmap for your writing and help you stay on track.
Creating Compelling Content
Write content that engages your audience and keeps them interested. Use descriptive language, examples, and real-life stories to illustrate your points.
Break up long paragraphs by using headings, bullet points, and tables when appropriate.
Introduction
Begin your post with a strong introduction that draws in the reader and explains what your post will cover.
Ensure to include a hook that encourages your audience to keep reading.
Body Content
As you dive into the main portion of your blog post, focus on providing helpful, accurate, and relevant information.
Divide your content into subheaders to make it easy to read and understand. Keep your tone conversational and relate to your audience using “you” and “your”.
Conclusion
Summarize key points from your post in a conclusion. This will help reinforce the information you’ve shared and leave the reader with a sense of closure.
Answer FAQs
End your post by addressing frequently asked questions related to your topic. Anticipating your readers’ questions will make your blog post more valuable and help establish you as an expert.
Remember to write in a confident, knowledgeable, neutral, and clear tone of voice, without making exaggerated or false claims.
Step 4: Install RankMath or Yoast
Before optimizing your blog post, choosing and installing an SEO plugin is essential. Two popular options are Rank Math SEO and Yoast SEO.
Both plugins offer a set of features to help improve your post’s readability and search engine optimization.
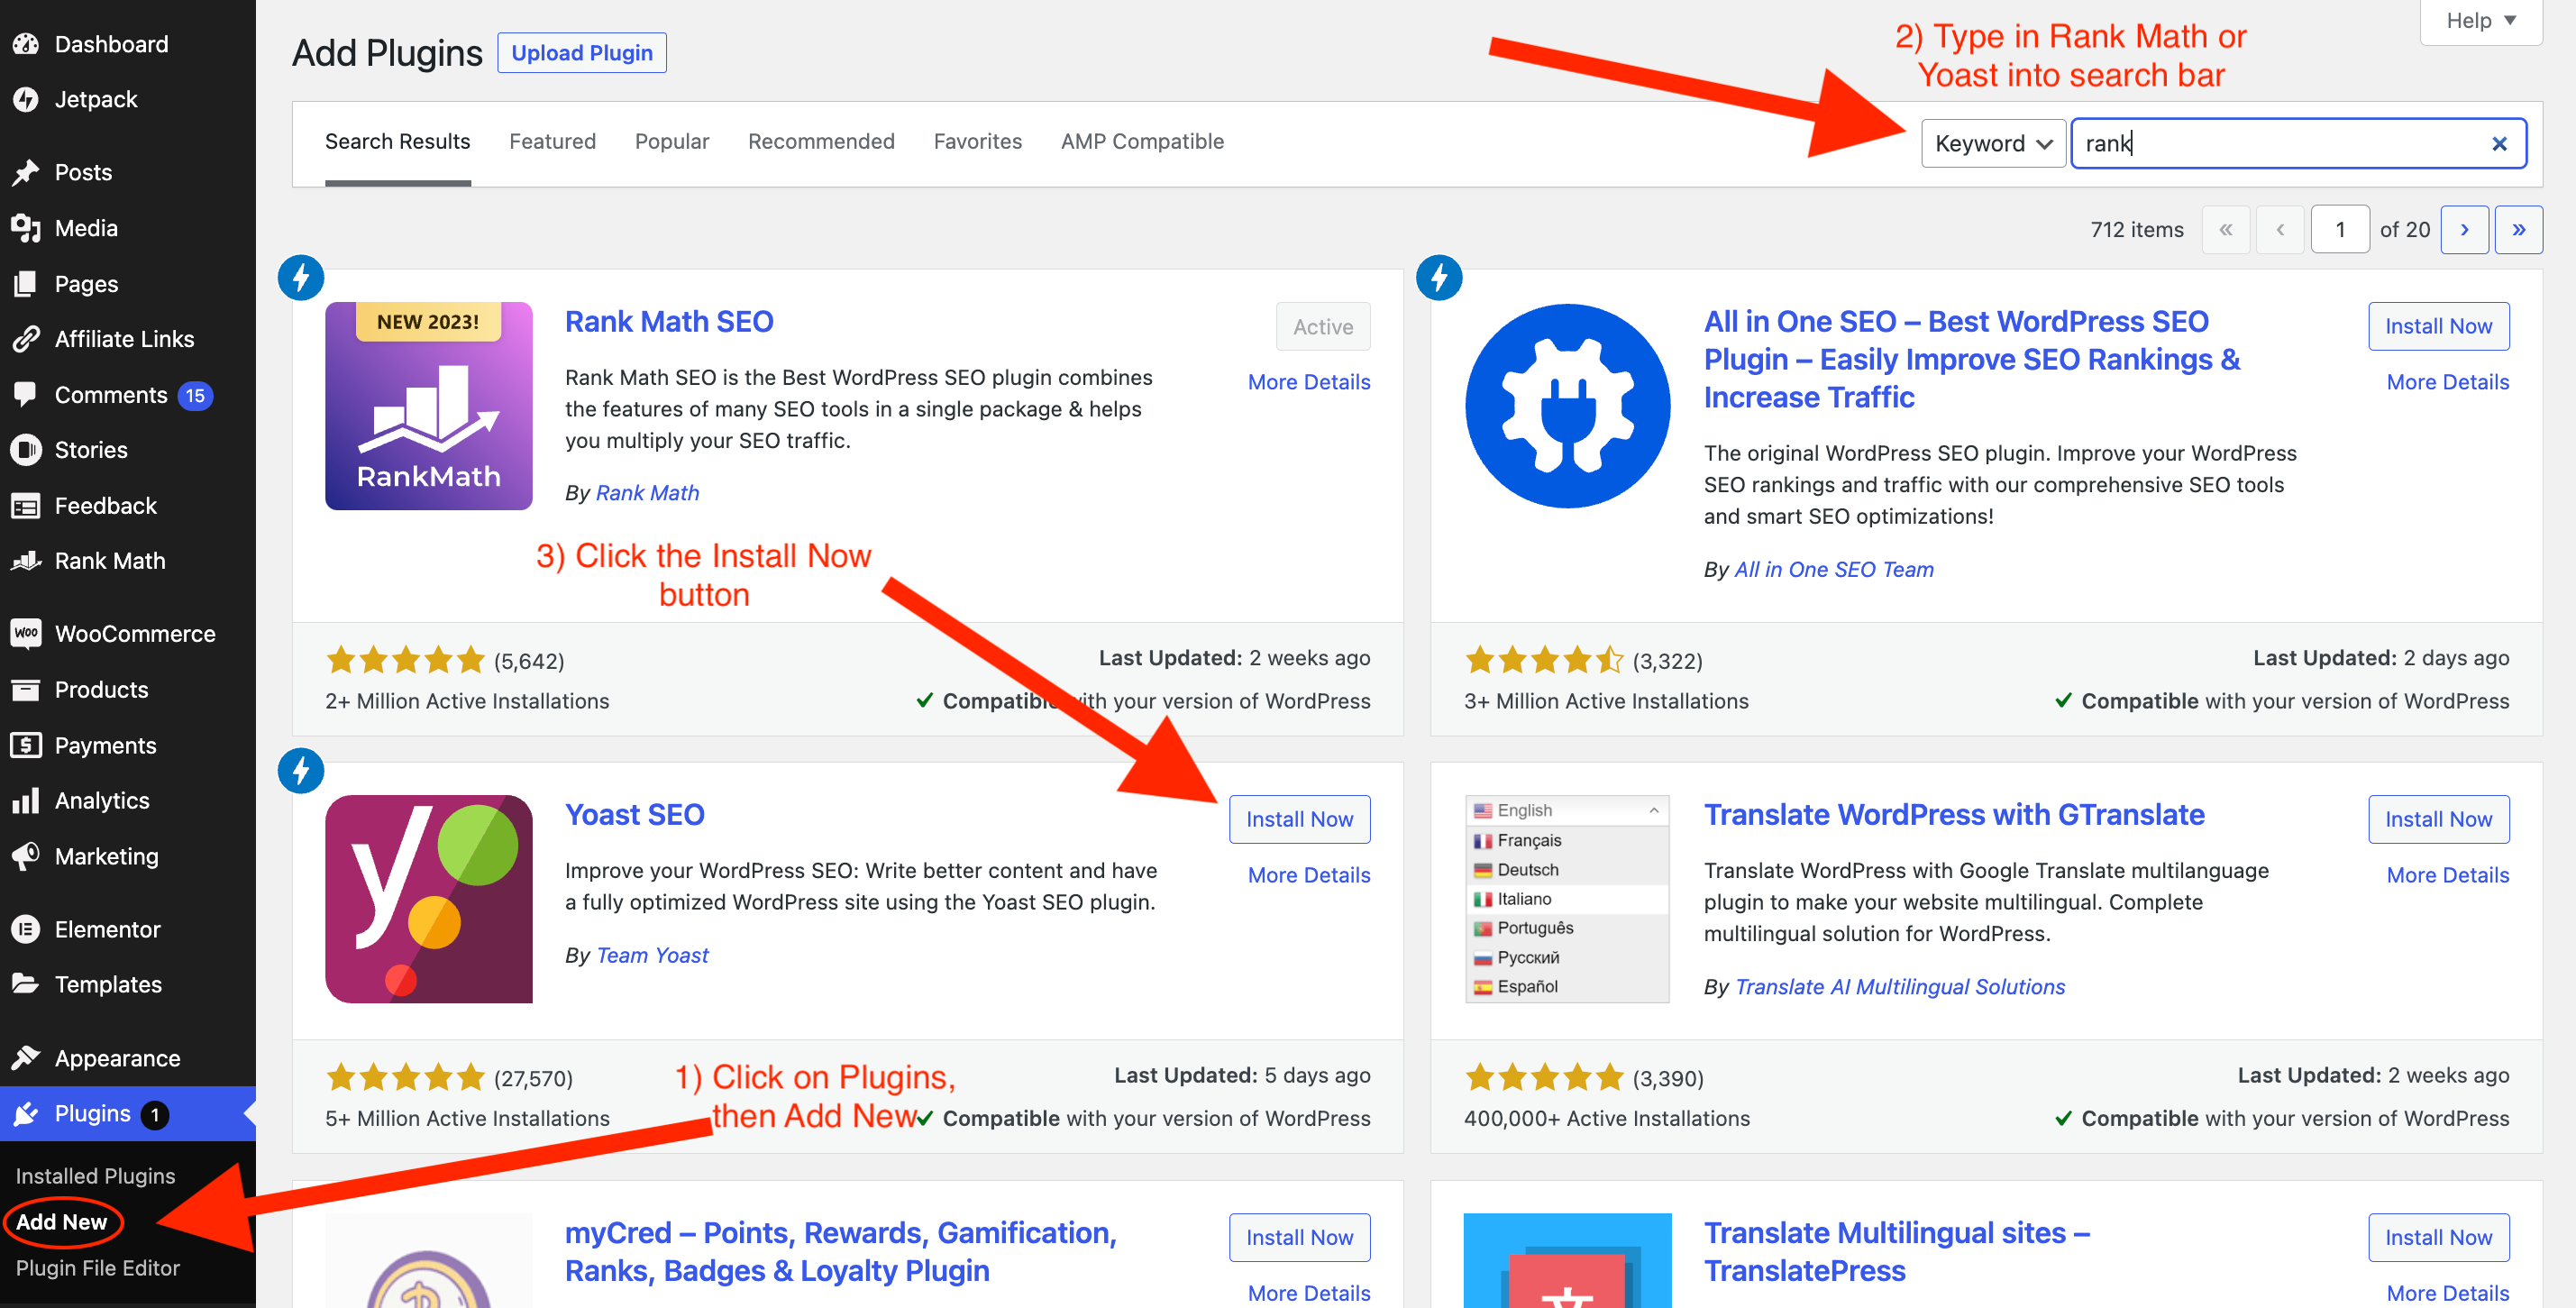
To install Rank Math, follow these steps:
- Go to your WordPress dashboard.
- Click on “Plugins” in the sidebar, followed by “Add New.”
- Search for “Rank Math” in the search bar and click “Install Now.”
- Once installed, click “Activate.” Complete the setup wizard to configure the plugin.
For Yoast SEO, the installation process is similar:
- Go to your WordPress dashboard.
- Click on “Plugins” in the sidebar, followed by “Add New.”
- Search for “Yoast SEO” in the search bar and click “Install Now.”
- Once installed, click “Activate.” Follow the on-screen instructions to configure the plugin.
Both Rank Math and Yoast SEO offer premium options for additional functionality. Rank Math’s premium version is more affordable and supports unlimited websites.
On the other hand, Yoast SEO is a widely trusted plugin with a solid track record.
Once you have installed and configured your chosen SEO plugin, it’s time to optimize your blog post.
The plugin will provide suggestions and guidelines, such as keyword usage and readability, to help you improve your content’s performance in search engines.
Remember, SEO is an ongoing process, so always revisit your blog posts and update them as needed to keep up with the latest best practices.
Step 5: Create New Blog Post in WordPress
Create an Engaging Title
When starting a new blog post on WordPress, crafting an engaging title that captures your reader’s attention is essential.
Spend some time brainstorming and considering your target audience’s interests. Make it descriptive, informative and relevant to the content. An effective title will encourage readers to click and explore your blog post.
Using the Block Editor
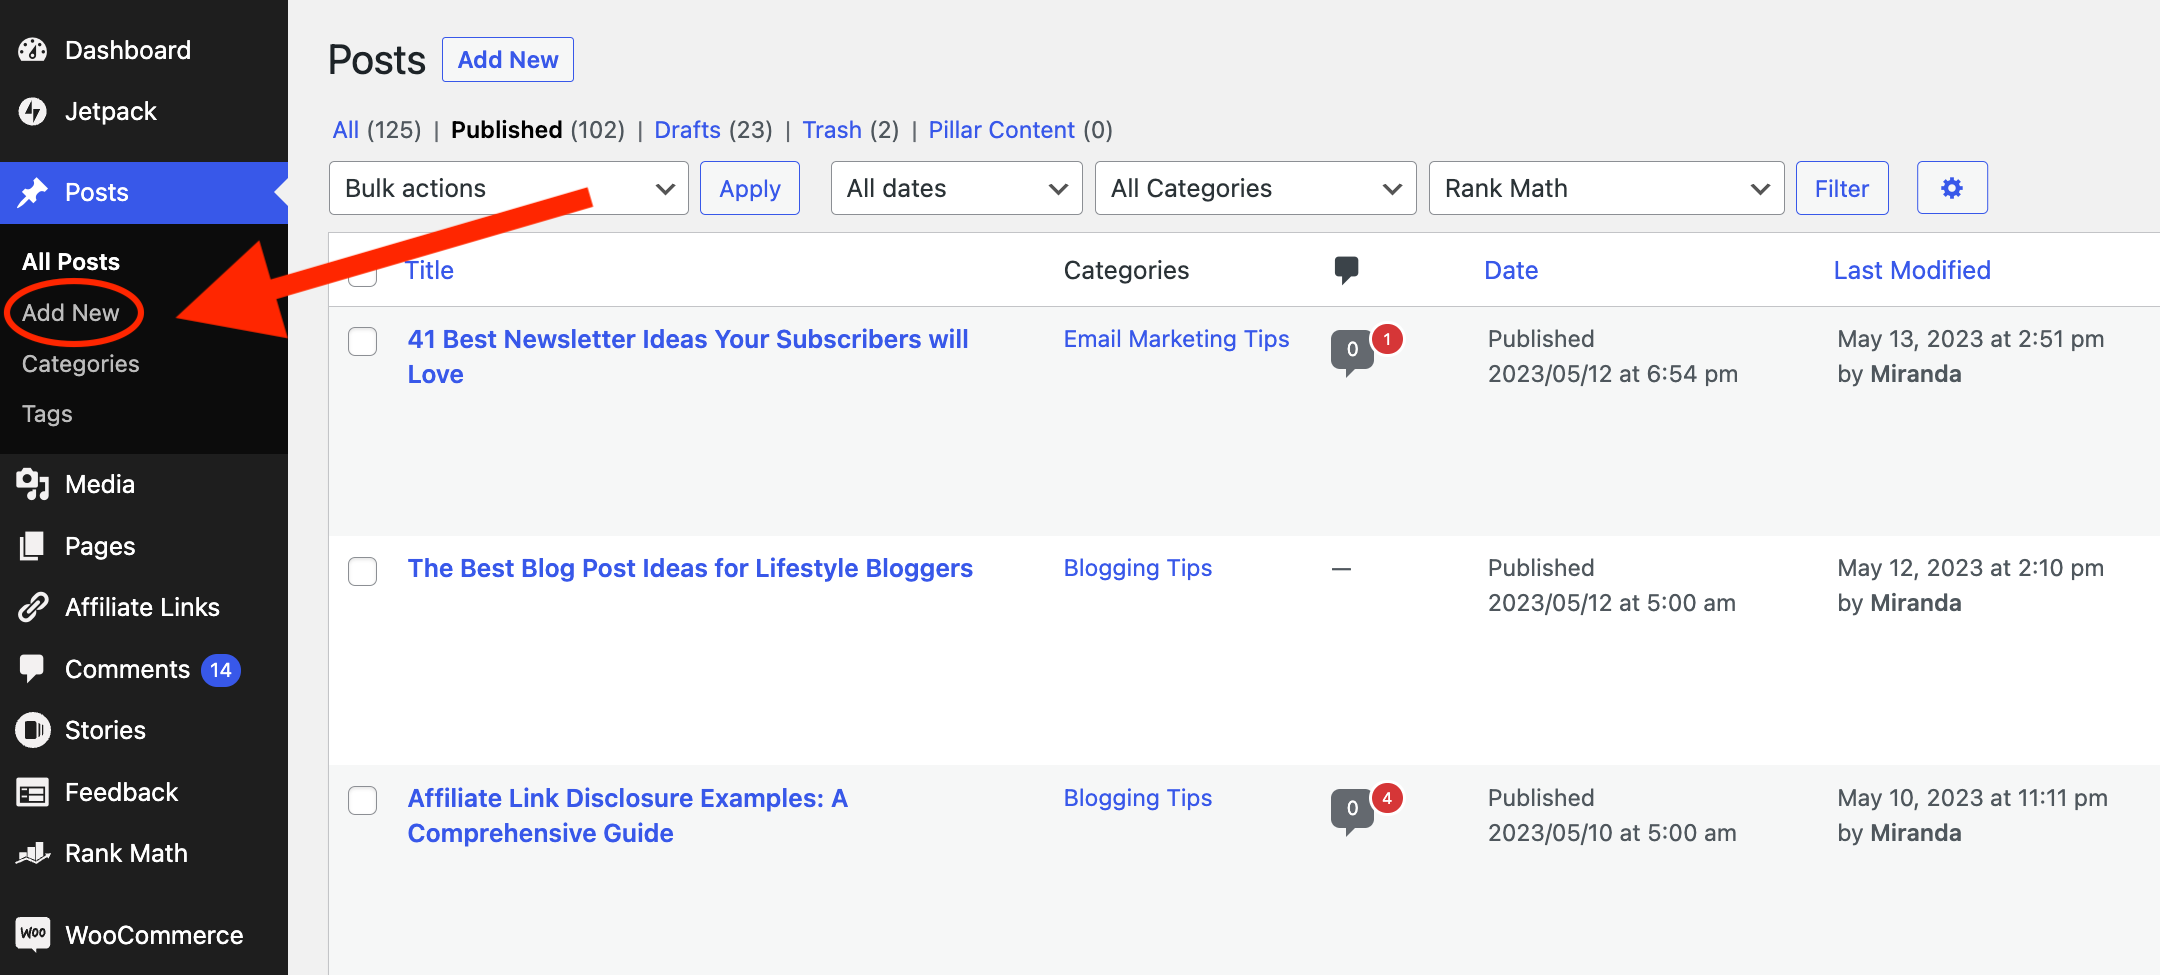
Follow these steps to create a new blog post on your WordPress dashboard:
- Log in to your WordPress dashboard.
- Click on “Posts” from the menu options on the left.
- Select “Add New.”
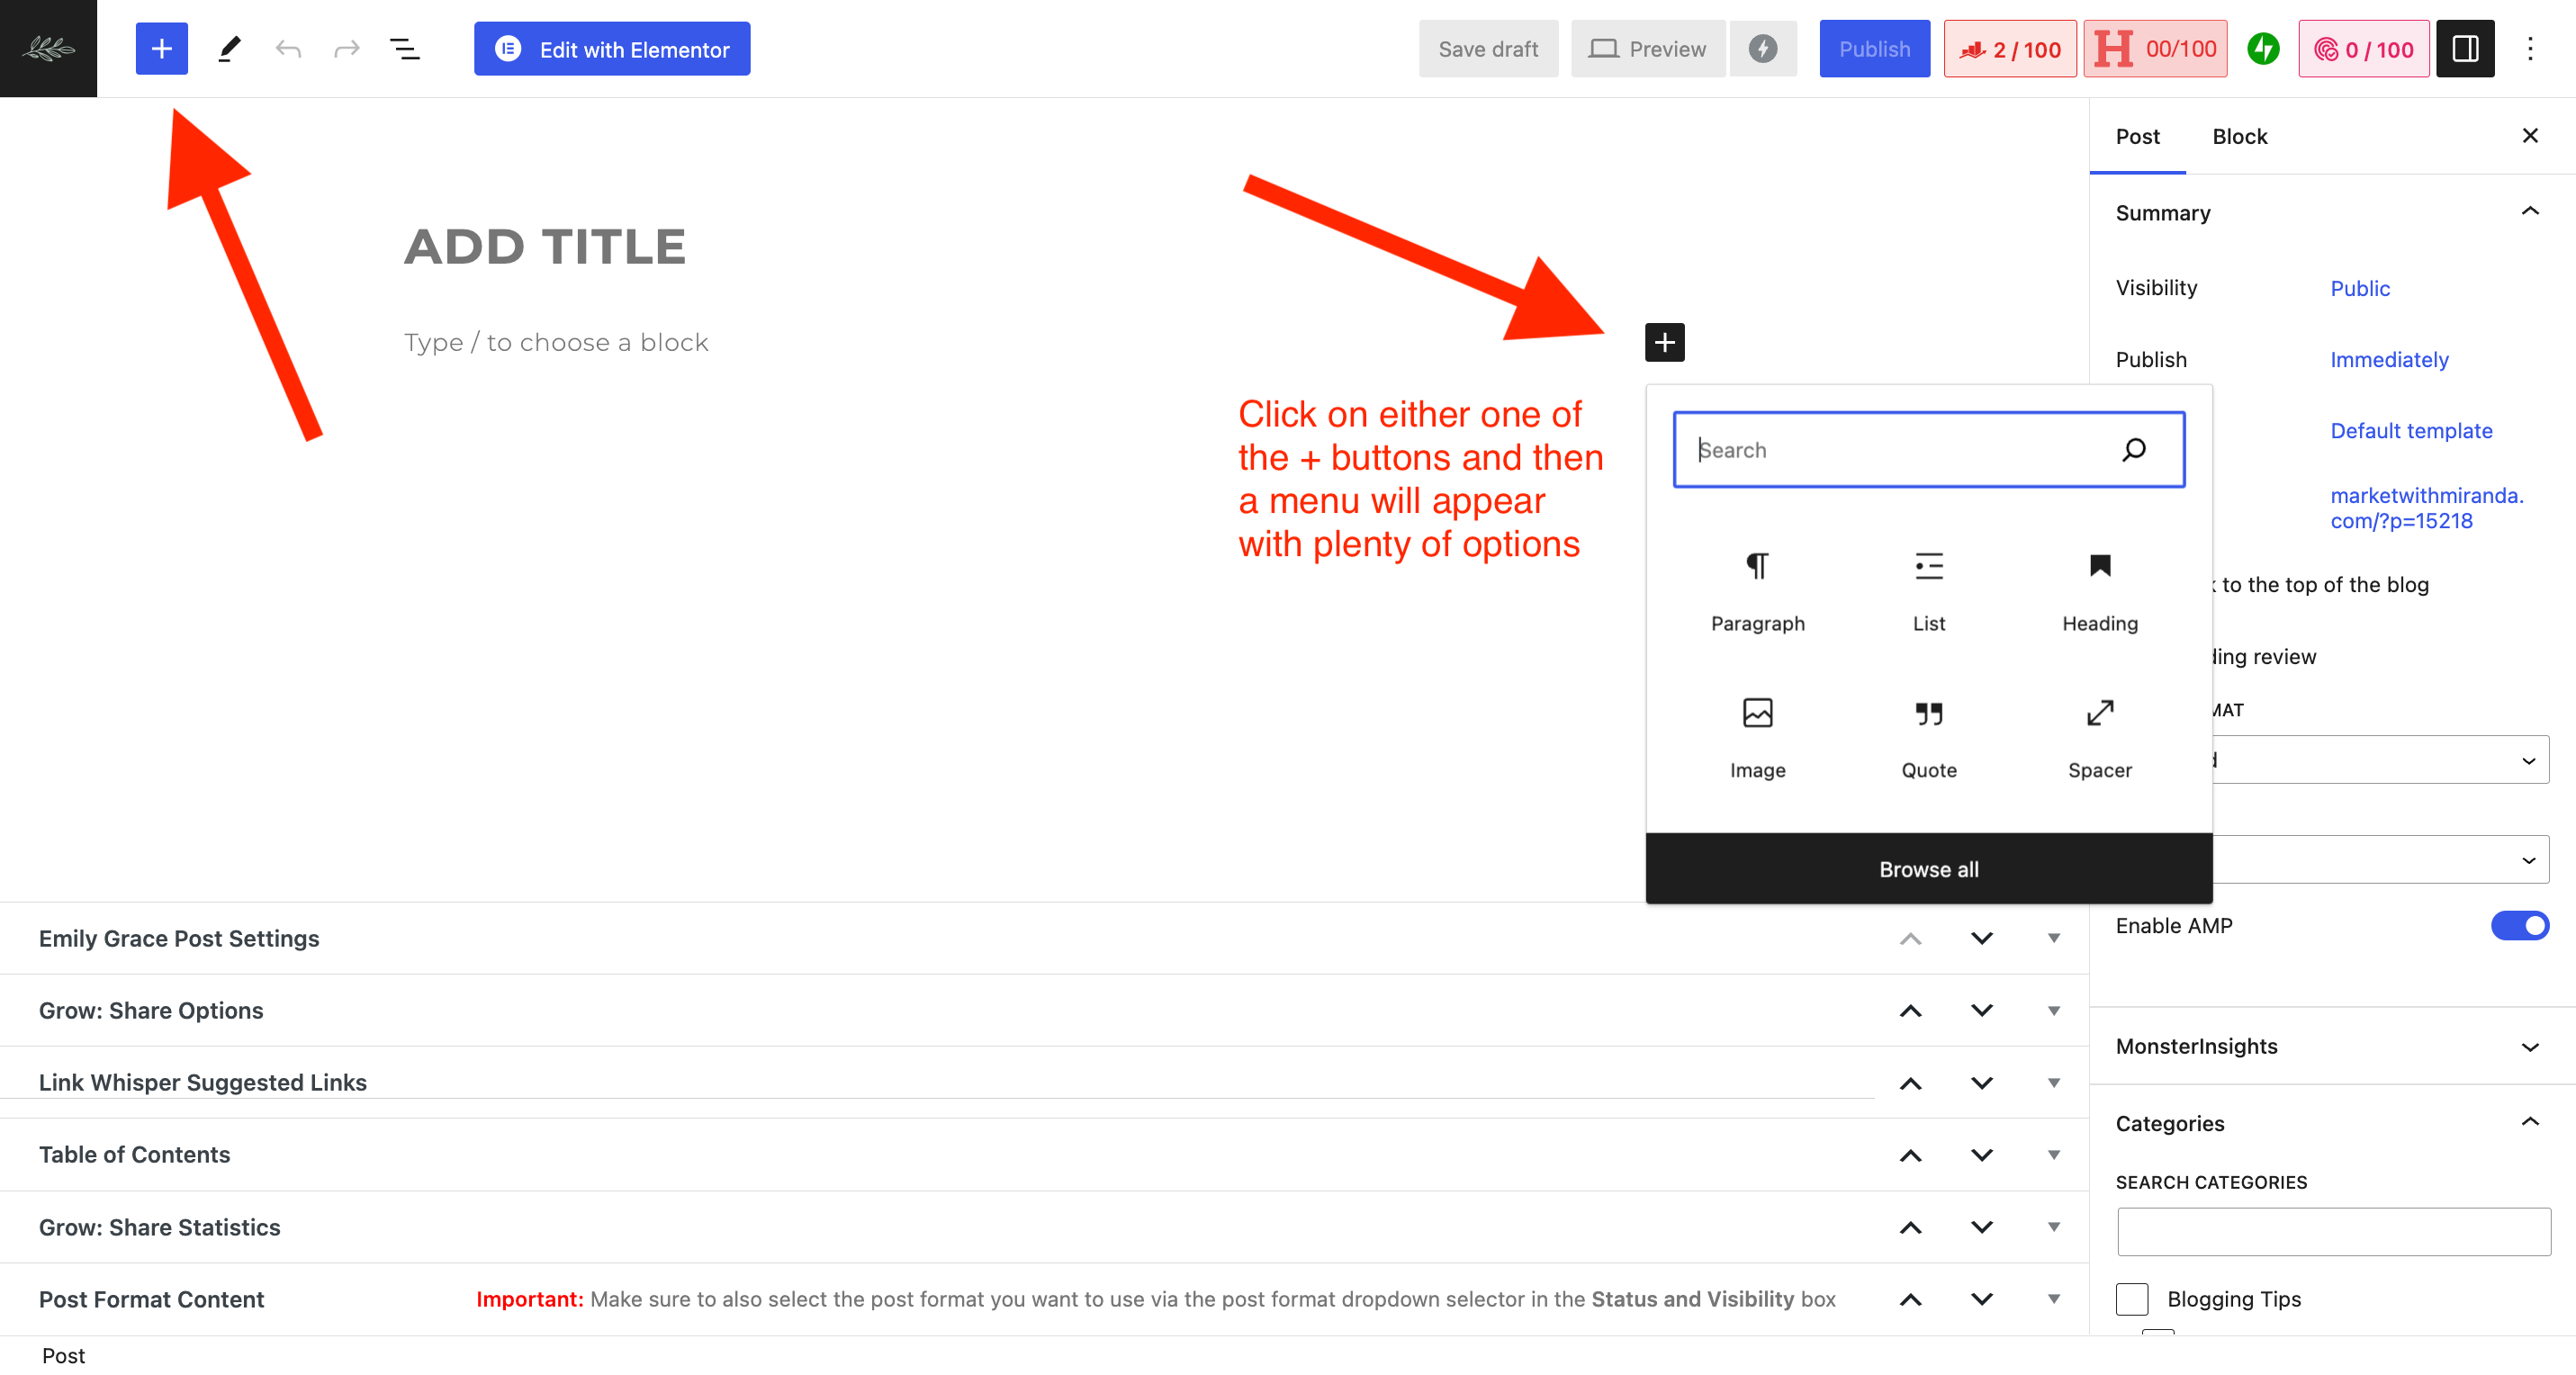
You will now find yourself in the Gutenberg or Block Editor. This powerful tool allows you to format and design your blog post effortlessly. Here are some useful functions:
- Click the “+” icon to add a new block.
- Select from various block types, such as paragraph, heading, image, and list.
- Easily rearrange and reposition blocks using drag and drop.
- Customize the appearance of each block.
Spend some time exploring the Block Editor’s features to create an attractive and engaging post.
Select a Category and Tags
Organizing your content with categories and tags helps your readers easily find relevant information. To add a category in your WordPress blog post:
- Click on “Document” tab in the right sidebar of the Block Editor.
- Scroll down to “Categories” and click on “Add New Category.”
- Enter the category name and click on “Add.”
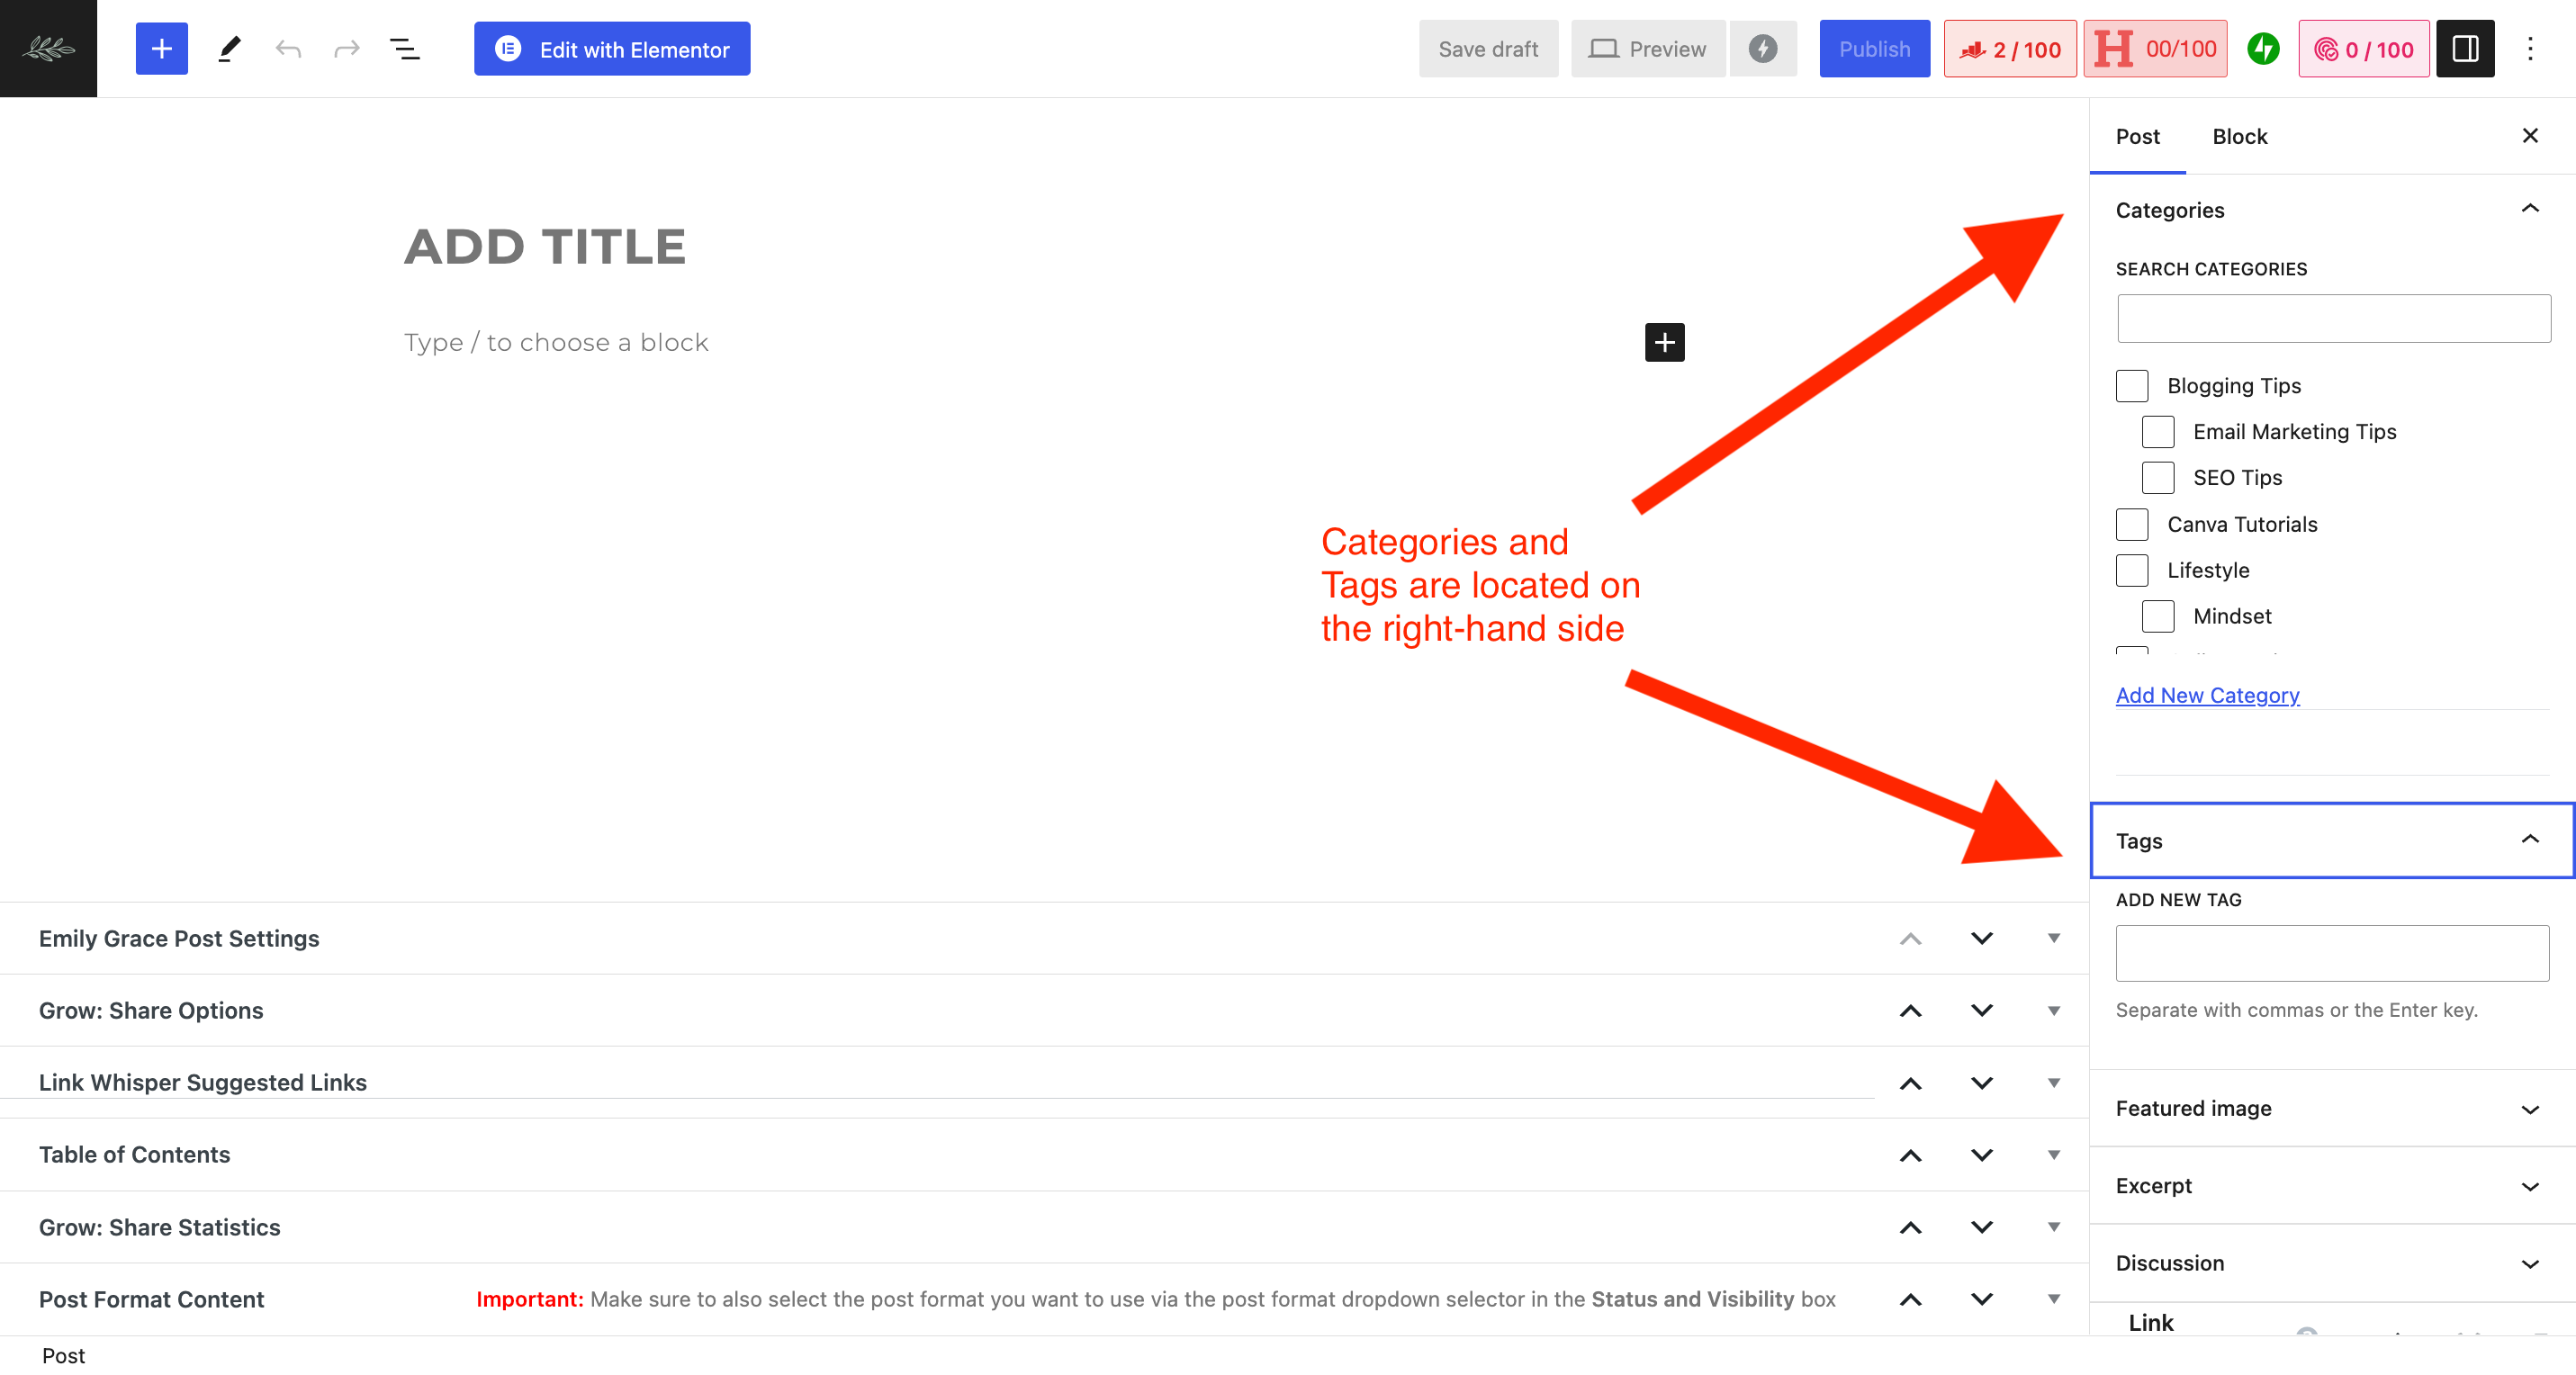
Similarly, you can add tags to your post:
- Scroll down to “Tags” in the same “Document” tab.
- Enter the desired tags, separated by commas.
- Press “Enter” or click on “Add.”
Using categories and tags effectively keeps your content well-organized and increases your blog’s search engine visibility.
In summary, begin by crafting an engaging title, utilizing Block Editor’s features to design your post, and organizing your content with categories and tags.
These steps will help you create an appealing and informative blog post on WordPress that is easily accessible by your readers.
Step 6: Optimize Your Blog Post for SEO
Leveraging Keywords and Headings
Using relevant keywords throughout your content is essential to optimize your blog post for SEO. Start by researching and identifying the primary keyword for your topic.
Then, incorporate that keyword into your headings (like H2s and H3s) and within the main text a few times.
Adding Media and Formatting
Enhance your content’s user experience by adding media like images, videos, and infographics. This makes your post more engaging and visually appealing.
Also, break up your content into shorter paragraphs, use bullet points and tables when necessary to improve readability.
Choose a Featured Image
Select a captivating featured image that reflects the content of your blog post. This will be readers’ first impression of your post, so ensure it’s visually interesting and in line with your topic.
Utilizing Alt Text for Images
Add descriptive alt text to all images to further optimize your blog post. This assists in accessibility and provides search engines with more context about the content of your images.
Crafting SEO-Friendly URLs
Keep your blog post’s URL short, descriptive, and include your primary keyword. This helps search engines understand the focus of your post and improves user experience.
Add a Table of Contents
Including a table of contents in long-form content is useful for readers to navigate your post quickly. It also helps search engines comprehend your content structure, increasing your chances of better search rankings.
Link to Outside Sources
Back up your statements by linking to reputable outside sources, like research papers, articles, or industry experts. Doing so adds credibility to your content and may result in higher search rankings.
Internal Linking
Boost the visibility of your other blog posts by linking to relevant, previously published articles on your site. This not only helps readers find additional information but also helps search engines better understand your site’s structure.
SEO Title and Metadescription
Optimize your post by crafting a compelling SEO title and metadescription that includes your main keyword. This entices users to click on your post and signals the content’s focus to search engines.
Step 7: Monitoring Performance
Previewing and Publishing the Blog Post
Before hitting the publish button, it’s essential to preview your blog post to ensure everything looks perfect. Check for formatting issues, broken links, and missing images.
WordPress allows you to use the Preview feature to see how your post will appear to your readers. Once you’re satisfied with your blog post, click the Publish button to make it live on your WordPress site.
Analyzing Traffic and Engagement
Monitoring your blog post’s performance is crucial in evaluating its success. To track traffic and engagement, start by connecting your WordPress site to Google Analytics.
This will provide you insights into user behavior, such as page views, time spent on the page, and bounce rates.
Some key metrics to focus on:
- Total Visits: The number of times your blog post has been viewed.
- Unique Visits: The number of individual users who have visited your blog post.
- Bounce Rate: The percentage of users who leave your blog post after viewing only one page.
- Average Time Spent: The average time users spend on your blog post.
Making Improvements Based on Data
As you monitor your blog post’s performance, you may identify areas for improvement. Use the data gathered from Google Analytics to make informed decisions about updating your content or adjusting your promotion strategy to increase search engine visibility and drive more traffic to your blog.
To boost your blog post’s SEO, consider the following techniques:
- Optimize your content with relevant keywords.
- Improve your post’s readability by adding bullet points, tables, and sub-sections.
- Set relevant meta-tags and descriptions to help search engines understand the content better.
Remember, you can always continue to refine and improve your blog post based on feedback and insights from your readers and analytics data.
Writing a successful blog post on WordPress is an ongoing process that involves learning and adapting to your audience’s preferences and needs.
Conclusion
For more help with WordPress and blogging, check out these posts!